Monday, March 14, 2011

And Some Progress Too...

Here is a quick list of some of the things I did recently.

Installed the steering shaft.

Installed the gas pedal and started the installation of the clutch pedal.

Started installation of the radiator.  Running into some issues with this.  More to follow.

I was going to install the fuel tank, but found that I have the wrong size bolts.  Easily resolved, but for now, the fuel tank still sits on the floor.

Figured out how I want to run the flexible brake lines from the frame to the brake calipers.  It had to be done in a way so as to not rub on anything.

Off-topic.  I saw a couple extra bonus pictures I thought I'd throw in.

Laurie having dinner with Joe Girardi (manager of the NY Yankees).  Maybe she's a secret Yankees fan?

Ben receiving a life-saving award from the Red Cross with a commendation signed by President Obama.

Bling!

I did manage to accomplish a few things this past week, but one of the highlights had to be the arrival of my wheels!  I ordered them back in October and they're finally here.


The style of these wheels match the original Shelby Cobra.

My one fear turned out to be okay and that was that the front brakes I had installed would be too big to fit inside the wheels.  Fortunately, they clear by 3/16"!

Brief Detour

A week ago, I laid out my plans for what I hoped to accomplish this week.  Then life got in the way.

Over the next 10 weeks, I'm going to be teaching a boat building class at our local arboretum.  Since the director knew I have a fully-equipped workshop, he asked if I could build a storage locker for the tools and supplies we'd be using in the class.

It became more involved than I originally planned, but I'm happy with the results.

It's a monster - four feet wide and three feet tall.

The class is held one afternoon each week for kids around 12 years old.  I expect that I'll be spending extra time between classes fixing problems and keeping the project on the time schedule.  It should be fun.  I'll post a few progress pictures along the way.

Sunday, March 6, 2011

Disaster Strikes (then averted)

Before anyone gets worried, I didn't hurt myself (or anyone else), I didn't break anything and I didn't do any permanent damage to anything.  But here is what happened.

First of all, we went skiing during Presidents week and had a great time (that why there were no posts during the week of Feb 20), but that doesn't have anything to do with this post.

Of course, I ordered some parts before we left for vacation and they arrived while we were away.  We got home late Saturday night so on Sunday (Feb 27) I opened the boxes and had received the bolts I needed to complete my rear brake installation.  Everything went together easily.  Then, as I checked it over, I saw the problem.  Remember those lovely brake brackets I toiled over (and was very proud of)?  Well, they were flawed and the brakes didn't fit correctly.  It was like I was hit in the gut and I walked out of the garage with my head hanging.  How could it happen?  I measured, tested, fit, measured some more.  I couldn't do any more work that day.  Would I have to start over again making new brackets?  I couldn't believe it.  Let me show you what happened.

Remember this?  The bracket is the curved gray piece with 4 bolts going through it.  I thought it was perfect.
I installed the bracket.  Now it's painted blue (you can see 2 of the bolts going through it.
Here's the problem.  When you look down from the top, the brake caliper is rubbing on the upper control arm and will hit the bolt head as the brakes are applied.  (I tried to put a couple arrows to show where the problem is)
 The black bushing was much thicker than I thought it would be and it pushed the upper control arm back toward the caliper.

For about 2 days, I couldn't do anything.  I also felt like I couldn't show my virtual face until I had a resolution.

I finally forced myself to go back to work.  I started over again with the design to see what I would have done differently if I knew about the clearance issue.  I made 3 new versions of the bracket out of wood and tested each one on the assembly.  I selected the one I thought fit best and fine tuned it.  Then I checked it against the actual brackets and found that if I moved 2 of the mounting holes about 1/4" and did some grinding, I could reuse the old brackets.  So that's what I did.

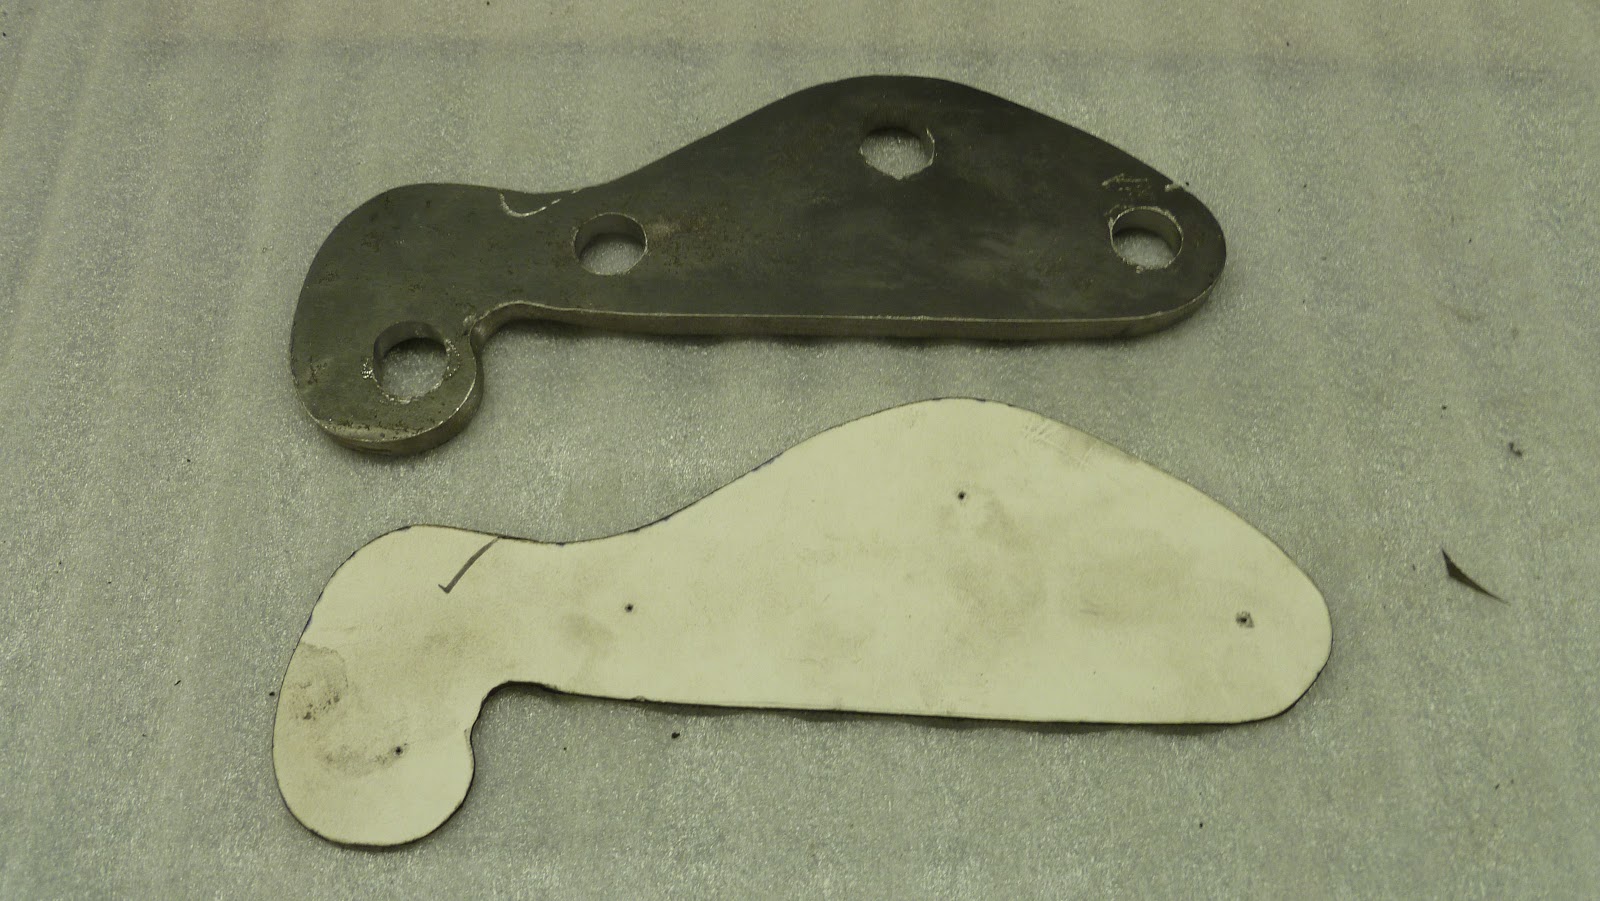
In this picture, the bottom bracket has been modified.  Holes 2 and 4 were each moved to the left about 1/4" and the overall bracket was shortened.

Here they both are after the modifications.

Repainted and as good as new.

This afternoon, I reinstalled them and I'm very happy with the results.  This is a picture of the other side compared to the photo above, but you can see that now there is plenty of room between the bolt head, the control arm and the caliper.

Here is a photo of the new bracket installed and ready to go.

Here is the completed rear suspension.

What a relief...

I did actually get myself to do a few other things this past week.  I refurbished the fuel tank.  That will be installed this week.


And, I started test fitting the aluminum panels that will form the trunk area.

We had a lot of visitors this week (thanks to Ben's squash team party at our house).  One of the dad's offered to let me use the sheet metal fabrication facility at his company which will be great.  I have a lot of metal to cut and bend.

Here are some goals for this week.  Modify the brake and clutch pedals (more on that later) and install them.  Install the gas tank.  Install the steering shaft.  Make a mock-up of the engine to check clearance in the engine compartment.  And of course, order more parts.

I'm glad to say, I'm back in business.

Friday, February 18, 2011

Progress, Real Progress

More progress yesterday.  I installed the steering rack which is the device that connects the steering wheel with the front wheel spindles.  With that, I officially have steering.

I also finished the rear suspension and installed the axles.  Here is one of the axles about to go into the rear spindle.  There is one of these for each side of the car so that they can operate independently.

Here is the axle and spindle installed.

Basically, all four corners of the car are done and if I had my wheels/tires, I'd be able to have the boys push me around the driveway like a go-kart (a 500 lb. go-kart, that is).

So, here I am, back at the computer trying to figure out what's next.  First, I have to step back for a few minutes and enjoy my accomplishments so far.  Okay, enough of that, now what's next?

As I've probably said before, the aluminum panels that make up the engine compartment will be powder coated pearl black.  Since there is some lead time involved, I want to get those panels to the painter asap!  The problem is that I'm still designing them which means I have to make decisions about other things I'm not ready to decide yet.  For example, some of the panels will surround the radiator. But I don't have a radiator yet and I'm not sure what size it will be or exactly where I want to put it.  Some of the panels depend on how the body will sit on the car, but I don't want to temporarily mount the body if I don't have to.  Anyway, I'll have some design decisions to make, aluminum to buy (Metal Supermarket again), and I'll have to make a device that helps me make long, straight bends in the panels after I cut them out.  More on all that in future posts.

When the panels are at the painter, I'll probably work on a hydraulic clutch system I've been designing and finish the other pedal modifications.

Here's an interesting side note.  Sometime in the next few months, look for me in your copy of Kit Car magazine.  Before Christmas, I had another car builder come over to use my shop for some work he was doing on his car.  We took pictures of each step along the way.  Well, he wrote an article about the modifications he was making and submitted it to the magazine.  Who knows when it will be published, but supposedly, there a picture of me cutting out some of his parts.  I'll post if here when I get it.

Wednesday, February 16, 2011

Go, Greased Lightnin', You're Burnin' Up the Quarter Mile

One evening, Laurie and I were watching the History Channel and the show Modern Marvels came on.  I laughed when I saw the show was about "grease" (not the musical).

A month later, I'm in my garage and the front suspension just isn't working smoothly.  As I researched possible causes, one probable problem was using the wrong grease!  I went back to the show and ordered the same type of grease used on the catapults of aircraft carriers.  Unfortunately, it only comes in 55 gallon drums so if anyone needs to lube their car (or anything else), come see me.  Anyway, it did the trick and now the suspension moves very smoothly.  (Note:  I was told the grease won't help launch my car from zero to 165 mph in 2 seconds like a real catapult does!).

With the suspension set, I spent today installing the front brakes and tightening the bolts (hopefully for the final time).


It took me about a day to get one side done.  I think I had to take it apart about 3 times to fix things and adjust pieces.  The other side took 1-1/2 hours.  The power of learning!

Now I'm finishing the rear suspension which will be pretty much the same exercise.  Here's a couple pictures of the differential that Ben and I installed the other day along with the rear control arms.  In case you were wondering, yes, this part of the project will use some of that special grease too!


While I was waiting for the grease delivery, I did a few other things to move the project along.  For one, I bought new bushings for the rear spindles and they had to be installed.  Here is a picture of one.  Notice that there are ridged ends on both sides and it has to be slid through a hole that will hold the narrower, middle section.

I put some of the old, standard grease on it and tried whacking it with a hammer.  That didn't work at all.  Since it's made of hard rubber, all the hammer did was bounce and it was almost like the bushing was laughing at me.  "Ha, Ha, I'm not going in that small hole".  I needed a smarter idea so I made my own press using a long threaded rod, some nuts, washers and spacers.

Here is part of the setup.

The idea is that I'll turn the two nuts against each other and slowly draw the bushing into the hole.  Here's a picture of the whole setup in action.

The bushing contorted and screamed as I slowly compressed it, but it couldn't overcome the pressure and finally had to go through the hole.  Look who's laughing now!

The other thing I did was to layout the sheet metal for the passenger foot area.  I used poster board to make a full size template that I'll copy onto sheets of aluminum and then rivet the pieces together.


Looks like I'll be making another trip to Metal Supermarket.  Aisle 6, I believe.

Wednesday, February 9, 2011

Brake Bracket Bingo, Part 2

It's hard to believe it has been a week since my last update.  What am I doing all day?  Anyway, in my previous post, I was preparing to make brackets to mount the rear brake calipers. 

The first thing I had to do was find some 1/4" thick steel plate for the brackets.  Where does one go for such a thing?  The supermarket, of course!  Okay, not just any supermarket, but the Metal Supermarket.  It's just like a regular market, only with metal, lots of metal.


I found what I was looking for on aisle 4, between the cereal and the canned tomatoes.  At the checkout, I showed the guy my template with the graceful curves and tight radii, and all he could say was , "How are you going to be able to cut that shape?"  "Oh, don't worry, I have a few different saws I can use", I said with confidence.  But, the whole ride home my worry grew.

I was anxious to get started so when I got home, I traced the template onto the metal and tried the first saw, my band saw outfit with a metal cutting blade.  I pushed the stock into the saw blade expecting it to slice through like butter.  It didn't.  I pushed a little harder and still nothing other than having ground all the teeth off the blade.  There was barely a scratch on the metal.  Maybe this wasn't a metal cutting blade after all.  Undeterred, I went to the backup plan.  I got my angle grinder and fitted the metal cutting wheel.  This is a thin wheel of abrasive that spins at about 7000 rpm.  As I was preparing to start the first cut, I thought "Am I really going to be able to control this machine when it touches the surface of the metal?  Maybe I should try something else first."  So I made that the backup to the backup plan and came up with a new backup plan.  I had just bought some metal cutting blades for my jig saw so I decided to give it a try.  What could happen?  Break more blades or break the saw?  Maybe.  I clamped the workpiece to my table and brought the reciprocating blade to the metal.  I pushed, and to my own disbelief, it started to move into the metal.  Not fast, but it was cutting.  After about 1/4" of progress, I checked the blade and it was okay, but was so hot I wasn't sure if I was cutting the metal or melting it.  I got some water to quench the blade frequently and got into the routine.  Cut, quench, cut, quench...  It actually didn't take as long as I imagined it would.

I got both brackets cut and used the grinder to do some final fitting.  I then drilled the holes and now have two brackets.


And they actually work!


I still have to do a little more fussing to get the final alignment of the brake caliper and make sure the emergency brake cable fits, but the hard part is over.  Of this one step, anyway.