Wednesday, October 5, 2011

In More News...

Progress on other fronts.

Here are a couple pictures of the completed battery box.  I painted it to match the frame (upper picture), and added a front and bottom wall to protect the battery from any road debris (bottom photo).


This is the coolant tank.  I most cars, it is a plastic tank up by the radiator.  This one is stainless steel and looks cool.  I made the brackets at the top and bottom to mount it to the frame.

Next up, hook up the fuel lines and reinstall the radiator.  Right now, getting the car running this week is still feasible.  Keep your fingers crossed.

I've Got the Bends

Bending brake and fuel lines, that is.

Back in June I made my first attempt at bending steel lines.  It wasn't pretty.  Without really thinking about it, I had decided to start with the much stiffer fuel line (compared to the thinner brake line) and dive into the trickiest set of bends first.  I had no idea what I was doing, but I had straight pieces of pipe and a bending tool--you just use one on the other and away you go, right?  The first bend was fine, but since I hadn't planned anything out, there wasn't enough room for the tool to make the second bend where I wanted it.  Well, I forced it anyway and the bend ended up in the wrong place.  I kept going anyway.  The third bend would get the fuel line running from the back of the car to the front, and it would allow me to test fit the line for the first time.  I made the bend and brought it over to the car.  Oh no, I made it 180 degrees in the wrong direction!  Instead of running to the front of the car, it ran out the back like a tail pipe.  I still wasn't ready to give up so I tried to reverse the bend 180 degrees, but the line wouldn't have it and it just snapped.  That's when I raised the white flag.

That experience created a lot of anxiety for me.  Back in August I got up the courage to work a few pieces of brake line.  It wasn't too bad and I started to figure out a few techniques that helped me plan out the process.  I still wasn't excited about working on these lines, but this week, I was determined to finish them.  A couple days ago I finished the brake lines.  Here are a few pictures.


I'm very happy with how they turned out.

Maybe it even restored some of my confidence to get back to the fuel lines.  Yesterday morning, I went to the garage first thing determined to give it another go.  This time, I installed the brackets first so they would act as a guide and allow me to make more accurate measurements.  Boy, did that work much better.  I also started in the middle of the line and worked toward both ends.  That way, I could test fit the line with each bend.  And finally, I came up with a marking system that helped me to make sure I was bending in the right direction.

Well, here they are.  There are two because one brings fuel to the engine and the other returns excess fuel back to the tank.


This is the back area.

This is up near the engine.

These are the connectors so the line can transition to flexible hose near the engine (to account for the vibrations while the engine is running).

You can see the black flexible line running up to the pressure regulator.  I made a plywood template for a mounting bracket.  I need to finish that tomorrow.


I'm proud to say I've overcome my fear of bending lines.  And I didn't realize how much anxiety I had bottled up because of it.  Now that it's done, I feel like the kid in school who kept hoping the teacher wouldn't call on him to give his oral report even though he knew he'd eventually have to do it.  Once it's over, it's such a relief.

Saturday, October 1, 2011

One Way to Spend a Saturday Afternoon

Next Sunday is the monthly meeting of the local Cobra club. Since the weather is getting cooler, I decided this is my chance to have the guys look over my car before they go into hibernation. I'll need to get the car onto the trailer to bring it to the meeting and the only way to do that is to drive it on. That means I have a lot to do between now and then.

This afternoon I designed and built the bracket that will hold the battery. I found a spot up in front of the engine that seems just right. It will bolt to the frame and have long bolts that clamp the battery onto the bracket.

Here are the pieces.  The piece that looks like 1/3 of a box is the bracket I made.


Here it is with the battery in place.


Here are a couple shots in the mounting location (that's the front right wheel in the background).


Now it needs to get painted and I will probably install it on Wednesday.

Next up, painting the radiator and finishing the brakes.

It's All About the Radiator

Have you ever been driving down the highway and end up behind a dump truck that is dropping small rocks in its wake?  They bounce off your hood and windshield, and you curse him as you pass by.  Well, I started thinking about that and the fact that the front of a cobra is basically a huge vacuum cleaner, trying to suck in as much air as possible to cool the engine.  The only problem is that whereas a vacuum has a filter to keep the dust under control, a cobra has a lightweight aluminum radiator -- an all too easy target for the aforementioned rocks.  Even one small rock hitting the radiator at 60 mph could easily create a pinhole.


Look at the front opening - it's just a problem waiting to happen.  I like the look of the black hole and didn't want to add a grille like the one in the picture below (besides, it costs $200!)


My head is always full of things like this that I need to solve before moving on with construction.  The other day, I was casually wandering through the home improvement store to get some inspiration and I found the answer - a dog gate.  Okay, maybe it sounds even uglier than a grille, but stick with me.

Here it is.  Most people would buy this to put on their screen door so a dog doesn't tear up the screen, and I'm a little surprised that the manufacturer doesn't even bother to market it as a cobra radiator grille (maybe because they'd only sell one for that purpose and I would be their only customer).


Here is what I did.  First, I had to remove the arms sticking out at the four corners.  Then I disassembled two sides.


I trimmed the frame and screen to the proper dimensions.


And then reassembled it.


Here it is mounted on the radiator and ready to go.  The grille actually sits an inch above the radiator to provide some clearance.  The whole thing will be painted black so it will blend together.  It won't even be noticeable.


To get the grille to be spaced away from the radiator, I made these brackets.  It's funny how they look simple but took an hour to design and fabricate.


One everything is painted, the radiator will be ready to go back on the car with the new grille on the front and the fan assembly on the back.


And best of all, my grille only cost $20!

Monday, September 26, 2011

Two Steps Forward, One Step Back

Note to Readers:  Since I haven't been updating the blog regularly, I've added an email subscription feature on the top right.  If you enter you're email address, you will be notified when I post an update.  It keeps you from checking the blog only to see there is nothing new.  Hope you find it useful.

I continue to make progress toward my goal -- except when I'm not. 

And I'm not making progress when I have to take things off the car and redo them.  Today, I'm referring to the radiator.

This afternoon, I drained the coolant out of the engine so I could remove the radiator.  This was partly planned and partly unplanned.  The planned part involves permanently installing the cooling fan and attaching the radiator to the frame.  See, in my mad desire to get the engine started a couple months ago, I used zip-ties to mount the radiator and a wooden frame to hold the fan.  I haven't wanted to take the radiator back off since I won't be able to run the engine until it's back together again, but in the name of progress, I had to do it.


It's just a hunch that my temporary installation wouldn't pass inspection anyway so I got an aluminum box to hold the fan (painted black) and I'm working on a way to hold the radiator correctly.  As it turns out, mounting the radiator is not easy.  The unit is designed to stand vertically (as it would be in most cars).  In my case, it is tilted about 45 degrees so the weight of the radiator, fan and coolant is resting on four thin aluminum tabs.  I'm sure that over time with the heating/cooling and vibration, it will crack (ie, leak).  So I'm spending a little extra time now to avoid a big problem later.  I expect to tackle that tomorrow.

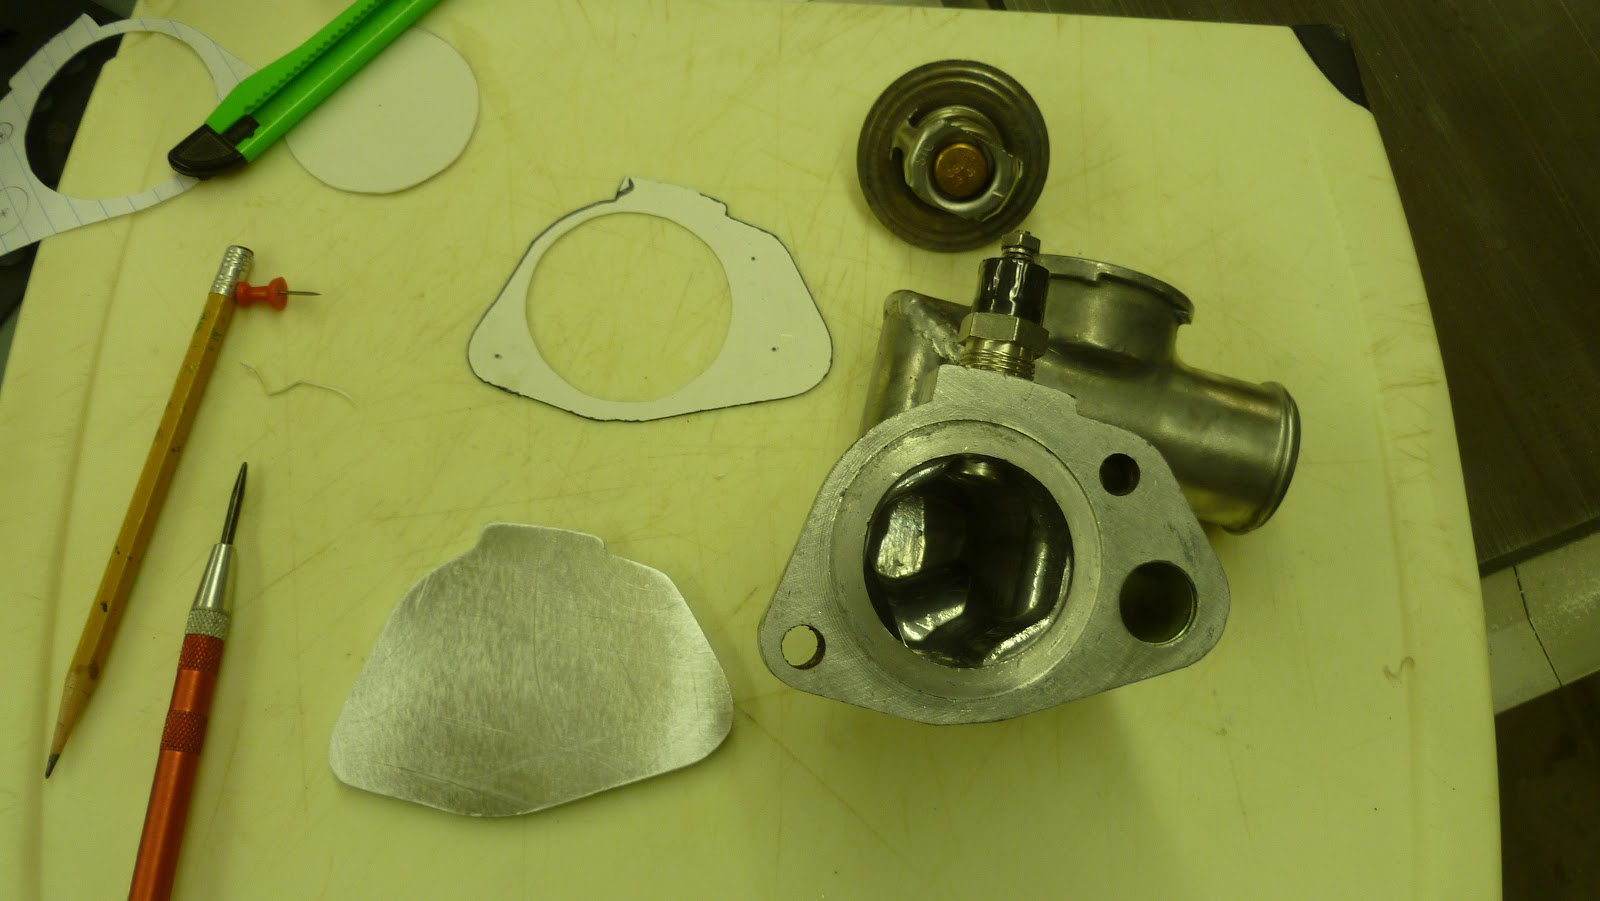
The unplanned part of this detour is to fix a coolant leak (I won't pass inspection with that either).  Again, in my haste to get the engine started, I saw that the water inlet on the engine didn't fit correctly and I tried to glob extra sealant on it, but it immediately started leaking as soon as the engine turned-over.  Now, I can hopefully fix it permanently.

My plan is to make an adapter that will help the coolant channels line up correctly.  I'm not sure why I even have this problem, but it may be because the parts I used on the engine span nearly 40 years of design evolution.  Anyway, I cut a blank out of aluminum and have started to drill holes through it at precise angles so the coolant has a place to flow other than on my garage floor.

Here is a picture of the water inlet and the aluminum blank on the lower left.

And here is a picture after the first two holes were drilled.  I'm testing the fit on the engine side.

Hopefully, this will work.  Unfortunately, I won't know until I put it all together again and start the engine.

In other news, I'm almost done with the brake lines.  I'm going to try to finish those tomorrow too.  After that, I'll be getting close to having a 2000 pound go-kart!

Friday, September 23, 2011

I'm Back!

Here it is, the middle of September already.  Hard to believe.  Well, shortly after my last post (back on August 5th), I decided it was time to take a short break from the car and pay more attention to the rest of my life (like family, friends, vacations, etc.).  What a great month I had!  A family vacation in Colorado filled with white water rafting, hot air ballooning, mountain biking and hiking.  Wonderful visits from friends near and far.  More trips to Vermont and California.  A hurricane.  And last but not least, the start of school.

This week, I finally got myself back in the garage.  Surprisingly, it was harder than I thought to get back into it.  I went out there Monday and started surveying where I had left off.  There were bolts left on the bench to remind me they had to go back on the car, but now I can't remember where.  There were things to do everywhere I looked.  Where did I leave off?  Where should I get started?

I decided to start with something quick and simple to feel like I accomplished something.  For that, I made and installed a short piece of brake line that I had measured before the break.  It felt good to get something done and that got me going again.  Laurie can tell that I'm back to work because I've already gotten three parts deliveries this week!

I found some old to-do lists and started tackling them.  Here are a few pictures:

This is a shot showing the firewall (the curved black piece behind the engine.  The one thing I did do during my break was to pick-up all the aluminum panels that had been powder coated.  They turned out great!

I test fit the dashboard to see how much room I have for a heater.  I got a little sidetracked by this because I thought I'd have to drill holes in the firewall for the heater (and I will at some point), but I decided to put the heater aside for awhile.  Hopefully, I won't regret putting this off.

I finished the connections for the hydraulic clutch so now it's ready to be filled with fluid and tested.

Here is another aluminum panel that forms the front wall of the driver's side compartment.  The brake master cylinder went in today (the white plastic unit).

I also completed a few other odds and ends:
     - Made a shim to raise the transmission for better alignment with the rear end and to help change the engine angle.
     - Made a magnetic switch to sense when the brake fluid level is too low.  This will be required to pass NJ inspection.
     - Started applying a soundproofing material to the aluminum panels so the car doesn't sound like a tin can.
     - Figured out how to permanently wire the battery and starter (and ordered the parts).

As I've said before, my next goal is to get the car moving under its own power.  I still have to run two more brake lines, bleed the brakes and the clutch, reattach the steering, connect the fuel lines and throttle, and permanently mount the radiator.  I keep telling myself that I'm close.  Maybe about 3 more weeks.

All in all, a good week.

Friday, August 5, 2011

Passing the Time

Earlier this week I was able to finally get the aluminum panels off to the painter.  As I'll discuss later, this is the most critical step I had to complete to keep the project moving.  First, I had to get the body off the frame in order to get some of the panels off.  It just so happened that we had guys working here this week to fix our air conditioning (certainly now was not the best time for it to break, but as they reminded me, not too many air conditioners break in the winter).   Anyway, they were showing interest in the car so I "offered" to let them help me take the body off.  They were glad to help and now after doing for the second time, it came off very easily.

I had originally told the painter I'd have about 10 panels, but this is what I ended up bringing.

There are 20 panels, some trim pieces I made for the interior and three sets of hinges (doors, trunk and hood).  I'm sure I'll later think of something else I would have wanted painted, but the shop wanted to do everything at once.  Fortunately, he was pretty good about doing all the extra parts.  They'll be ready in two weeks. 

I won't be able to do too much until I get these panels back because I have to install some of them before I can finish the brake lines, fuel lines and clutch line.  And I have to finish the brakes, fuel system and clutch before I can get the car rolling under its own power.  I'm really looking forward to that.  Sometimes I feel like I'm playing a complicated game of dominos where each step has to happen before the next.  Right now, I can see about 10 steps that have to happen in a certain order to get to the next milestone.  Maybe when this is over, I should write an instruction manual for the next guy (naw, that'd be no fun for me or him -- much better to figure it out the hard way).

As mentioned in the last post, I have a problem with how the exhaust lines-up with the body.  I called the company who supplied the exhaust and they basically told me not to worry about it.  They were sure it would all line-up when I did the final assembly.  I didn't really believe it so I put the whole exhaust back together to take some more measurements with the body off.  Right now, my conclusion is that I can probably get it all to fit, but it won't be perfect.  Any of you who come to look at the car will have to promise me that you won't use a ruler on anything and you can only look at one side of the car at a time.  With those two conditions, not many people will notice to slight differences.  After awhile, I may even forget about them too.

Since the exhaust was back on, I thought I'd pass the time by doing some more engine tuning.  It starts right up and is running more smoothly.  Here's another good reason why I want to get the car moving on it's own.  The first couple times I started it, I rolled the car out of the garage so any fire wouldn't take the house with it.  After that risk seemed to subside, it was still good to be outside so the exhaust could dissipate.  Well, the only problem is that the car has gotten too heavy to roll up the apron back into the garage.  It takes three people and usually I don't have others around to help.  So I've taken to starting the car in the garage for short periods.  Yes, it smells and the carbon monoxide is definitely a problem (although I'm going to start using it as an excuse when I do stupid things!).  When I get the car moving, I'll be able to pull it out and back in as I work on it.

I'll finish this post with a short video I took tonight of the engine running.  Until next time.